Half the Sugar Baker
Over winter break, I had some extra time, so I decided to attempt homemade croissants. Since this was my first ever try, I didn’t expect them to work out, but they came out amazing! The whole process took me 2 days, but a lot of that time was resting. These croissants were definitely the most complicated baking project I have ever done, but it was so worth it! Freshly baked croissants have the perfect contrast between their earth-shattering crust and super soft and fluffy interior. Overall, I think that croissants definitely require a lot of precision and attention to details, but it’s totally doable! I would recommend that every home baker tries to make croissants at least once, you just might surprise yourself! Here are my top tips and tricks that I learned from my first time baking croissants.

My general tips and tricks:
- Watch Claire Saffitz’s youtube tutorial – no seriously, I think I watched this video at least 7 times while making my own croissants. I used the NYT cooking recipe for croissants and this video perfectly demonstrated every step (also, who doesn’t love Claire?) Before I started, I watched the complete video to familiarize myself with the overall process, then before each step, I rewatched that section of the video so I knew exactly what to do. Especially with the steps where you have to fold the dough, the video really helped me visualize the steps. Also, Claire gives a lot of useful tips in the video!
- Make sure you have enough time. I’m not going to lie, making croissants is a long process and you definitely do not want to rush any of the steps. The whole process took me two days from start to finish, which I thought worked out really well. The first day is just for making and laminating the dough. The second day is for shaping, proofing, and baking the croissants. Between almost all of the steps, the dough needs to rest, which takes a lot of time. You definitely don’t want to rush the resting period because it’s essential to keeping everything cold and will also make the dough easier to work with.
- Be patient. This is similar to my second tip, but I think it’s really important. Some of the steps might take longer than what it says in the written recipe due to different variables in your home baking environment, for example, the temperature, the moisture in the air, your flour, etc. When I made the dough (also called the détrempe), it took almost 1 hour longer to rise than what the recipe stated. My croissants also took 1 hour longer to proof than the written recipe. I would rely on the actual visual cues more than the recipe throughout the recipe.
- Keep everything cold. That’s right, my permanently cold hands finally came into use. Since croissant dough relies on alternating dough and butter to create flaky layers, it’s important that the butter does not melt. This is why you have to freeze and refrigerate the dough between each laminating step. I tried to touch the dough as little as possible so that my hands would not melt the butter. I pounded and flattened the dough with my rolling pin as much as possible to avoid touching it with my hands.
- Pay attention to details and be as precise as possible. It might seem like overkill or just a pain in the butt, but you’re going to need a ruler when making croissants, preferably a long one. Paying attention to dimensions is going to be really useful when you laminate your dough and shape the croissants. Also, try your best to maintain super sharp corners on your butter square and dough. This will also help with achieving a good lamination. Trust me, it will all pay off when you bite into your freshly baked croissant.
- Have a good rolling pin. You will get a lot of use out of your rolling pin when making croissants. Not only is it used for rolling out the dough, but it’s also useful for pounding. I prefer a large rolling pin that’s the same thickness all the way through (no tapers). This helped me get the most even layers and helped maintain the corners on my dough. If you only have a tapered rolling pin, you just have to pay extra attention to keeping everything nice and even.

Specific tips and tricks:
- The détrempe. The NYT cooking recipe calls for a stand mixer, which would definitely make the process much easier, but since I don’t have one, I made the dough by hand. If you are making the dough without a stand mixer, I would recommend using very soft, room temperature butter in the détrempe. Also, I would add it before you add the milk and water. (Speaking of milk, I used 2% skim milk and it worked out fine). When I made the détrempe, I added the butter after the basic détrempe dough was already mixed, and I spent more than 20 minutes kneading it until the butter incorporated. I would still recommend kneading the dough for longer than you might like because it forms a better gluten network.
- The butter. Speaking of butter, I used Kerrygold unsalted butter and it turned out great. Although I have never tried making croissants with any other butter, I would still suggest that you use European style butter like Kerrygold. Claire Saffitz says in her video that Kerrygold has the best texture for croissants because it is flexible, even when it’s cold. This is essential to a successful lamination because you don’t want your butter to crack when you fold your dough.
- Pounding. While making croissants, don’t be afraid to pound the butter and the dough with your rolling pin. I did a lot of pounding, which helps to flatten and make the dough more flexible without warming it up.
- Corners. It’s really helpful to have nice sharp corners on your butter square and also your dough. This helps you have nice, even laminations. For the butter square, my favorite way to fill the corners is to roll at a 45º angle to the corner, which will form a small ridge of butter bisecting the corner. Then roll perpendicularly to ridge of butter and push it into the corner. (See the photos below). To keep the corners on the dough once it is laminated, I like to roll the dough on the edges of the dough rectangle towards the corner. I also like to gently tug on the corners if they start to become rounded.


5. Flour. When you are rolling out your dough, it’s important that you lightly dust your work surface so that the dough does not stick. You also don’t want to use too much flour because it could prevent the layers from sticking to each other when you laminate the dough. That’s also why you need to brush off all excess flour from your dough before you fold it. If you have a small tear in your dough, dust it with some flour so that the butter doesn’t stick to your work surface.
6. Keep the off-cuts. Throughout the recipe, I had to trim some of the edges. Everytime, I would save the trimmings so that I could use it later. I don’t think that I threw away any of the dough throughout the entire process. This isn’t necessary but I think that it’s a fun way to make the most out of your dough.
7. Shaping the croissants. The NYT cooking recipe makes 8 very large croissants, but I wanted to try out some different variations so I cut mine slightly differently. Out of my dough, I cut 2 4×14 inch rectangles, which made 4 full sized croissants. Then I cut 4 3×7 rectangles, which made 8 mini croissants. With the extra dough, I made some pain aux raisins. For the croissants, I cut a small slit at the base of the triangle so that it looked like two pant legs (see the photo below). This helps to make a slightly longer croissant.

8. The NYT cooking recipe tells you to let the croissants cool completely, but I think that you should try them while they are warm. It’s seriously amazing. The super crisp outside just crumbles in your mouth and it pairs perfectly with the fluffy, buttery, warm interior.

Some variations:
- Pain aux raisins. Pain aux raisins might be my favorite croissant variation. First, I made a super simple crème patissiere following this recipe. MAKE SURE TO LET IT COOL COMPLETELY before you use it. Once it is time to shape your croissants, instead of cutting out triangles, leave your dough as a rectangle. Spread on a layer of your crème patissiere and sprinkle on some raisins. Traditionally, you would roll it up and slice it into individual rolls, like a cinnamon roll, but I was scared to smush the layers in the dough, so I sliced my rectangle into long strips and rolled them up individually. Make sure to tuck the end of your rolls underneath so that they don’t uncurl while baking (I forgot to do this so mine completely opened up).
- Pain au chocolat. For pain au chocolat, you will need batons of chocolate. You can buy them premade, or cut your own from a bar of chocolate. Then instead of cutting your croissant into triangles, you cut out small rectangles and roll the chocolate baton into the croissant. For more detailed instructions, watch Claire Saffitz’s video.
- Cheese croissants. I made some cheese croissants using the larger offcuts that I had and they tasted amazing! I used thin slices of cheddar, because that’s what I had in the fridge. All I did was put a thin layer of cheese on top of my croissant dough and then roll it up. You could also add ham for a classic ham and cheese croissant.

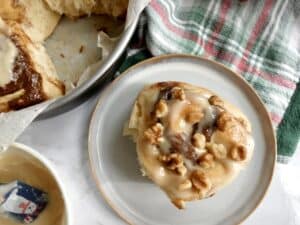
- Cinnamon croissant swirls. I made cinnamon swirls with the smaller offcuts of the dough and they might be one of my favorites! They have super flaky layers, and I love the crunch and flavor from the cinnamon sugar. I just rolled up the scraps into a tight swirl and placed it in a cupcake liner. Then I sprinkled some cinnamon sugar on top, which is just 1/2 teaspoon ground cinnamon mixed with 1 tablespoon of granulated sugar.

- For all of the variation above, I proofed and baked them exactly the same way as I did with the normal croissants.
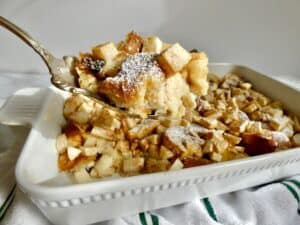
- Variations with already baked croissants. The day after I baked the croissants, they weren’t as crispy, so I wanted to reheat them. You could easily bake them for 5-10 minutes at 335º F, but I wanted to try something different. I had some extra crème patissiere so I sliced my croissants into two even layers, like you would for an almond croissant (which is also great). Then I spread a layer of crème patissiere onto each cut half. Then I sprinkled on some raisins and baked them, custard side facing up, for 5 minutes at 335º F. The crème patissiere added a really nice flavor and creamy texture, as well as adding a little bit of moisture.

Final thoughts:
First of all, thank you for making it all the way through my post, I truly appreciate it! I was blown away by these croissants, especially because it was my first time making them! Although croissants may seem like an impossible baking project, especially at home, I think that by paying attention to details, anyone can do it. It’s a super rewarding process and freshly baked croissants are truly amazing. If you try to make your own croissants, please let me know how it goes, and I hope this post was at least a little helpful! (And if you want to try some less complicated recipes first, don’t worry, you can browse them here!)